ELITE · NATIVE NINJATRADER
NINJATRADER SETUP
Elite runs Falcon directly inside NinjaTrader — no webhook, no third-party copier, no monthly bridge. This is the full screenshot walkthrough, from a fresh install to a live strategy on practice mode. Never used NinjaTrader? Every step is spelled out, and new terms are explained right where you need them.
★
START HERE
WHAT YOU NEED TO GET STARTED
Three pieces, in plain English. You've already got the first one.
Falcon AI Elite
The engine — you have this
The AI that reads the chart and fires the trades. Elite includes the native NinjaTrader strategy, so trades place themselves straight from your chart — no webhook or messenger needed.
Your subscription
🏦
A broker or prop firm
Where money & trades live
The account that holds funds and executes. A prop firm (Apex, Take Profit, Tradeify) funds you with their money for a fee; a broker (Tradovate, NinjaTrader, IBKR) uses your own. NinjaTrader connects straight to it.
Pick one to fund
💻
NinjaTrader 8
The free app Falcon runs in
A free desktop trading platform. You download it, import the Falcon file once, and it trades directly from your chart. This guide does the rest.
Get NinjaTrader →
Gold box = exactly where to click / look
Follow the steps in order.
1
PART ONE
GET FALCON INTO NINJATRADER
1
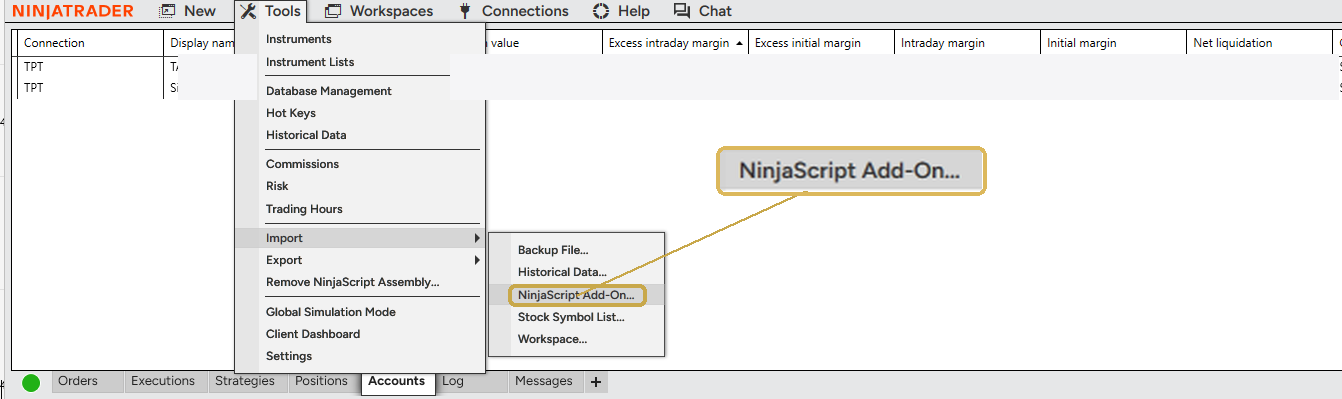
Import the Falcon Elite file. Download FalconAI_Elite from Discord #settings-vault (or your welcome email). In NinjaTrader: Tools → Import → NinjaScript Add-On → pick the file → restart NinjaTrader.
2
Connect your broker / prop. NinjaTrader links straight to your account — the exact steps depend on your provider (Rithmic, Tradovate, your prop firm). The gist: Control Center → Connections → Configure → add your provider → enter your login → Connect (the bottom-right dot turns green).
3
Turn on real-time data. Falcon trades on live price, so you need a real-time CME data subscription (~$4–12/mo, non-professional rate). For example, Apex on Rithmic: add it NinjaTrader-side.
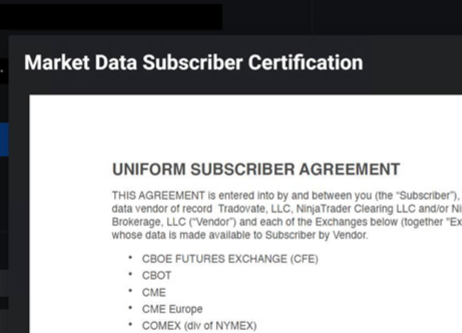
⚠ TRADOVATE USERS — SIGN THIS FIRST
Tradovate sends no real-time data and no trades until you sign your Non-Professional Agreement. Log into Tradovate, and on the Market Data Subscriber Certification, choose Non-professional → Next. It's free — this is the single most common "why isn't my data live?" cause.
2
PART TWO
OPEN A CHART & LOAD FALCON
4
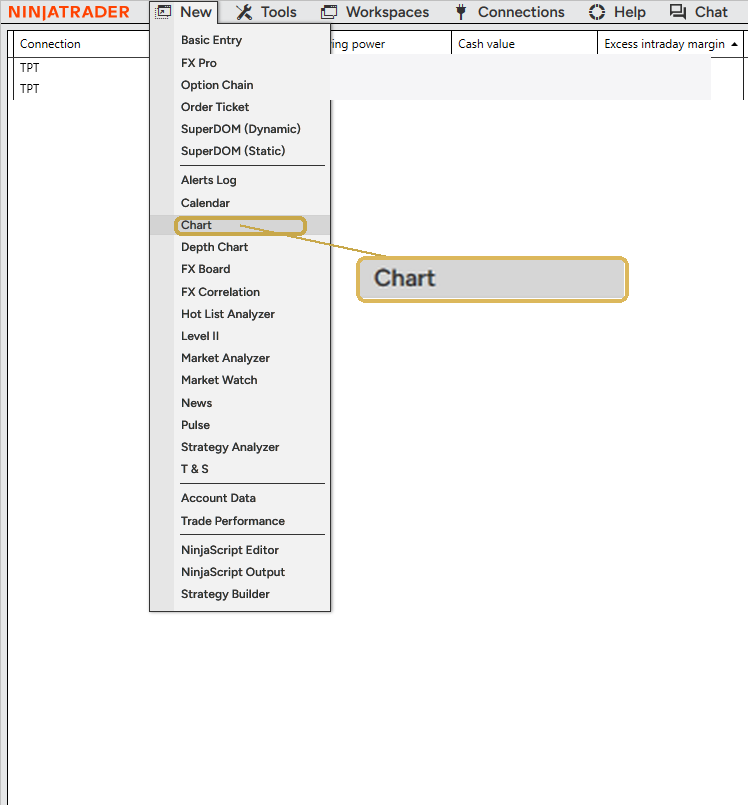
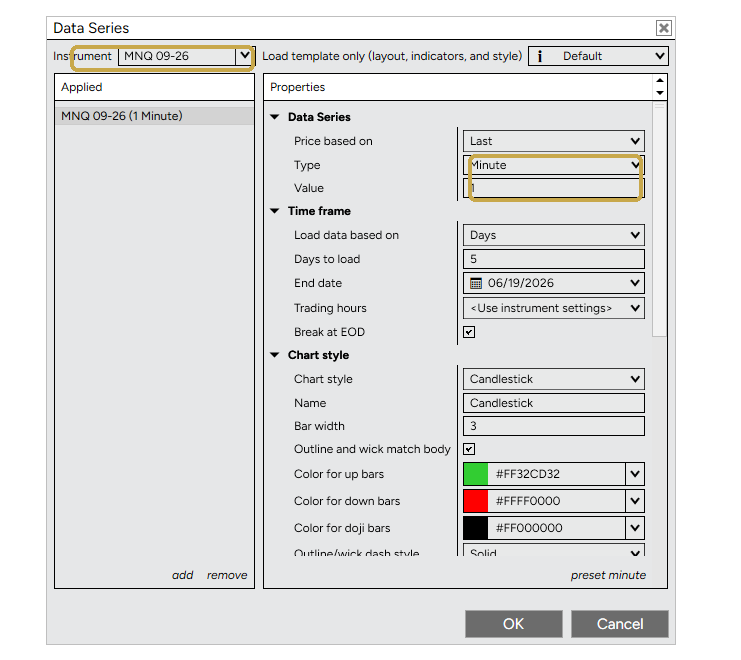
Open an MNQ chart. Control Center → New → Chart. In the window that opens, set Instrument to MNQ (the front-month Micro Nasdaq) and the timeframe to Minute · 15 or 30 — Falcon runs on both.
5
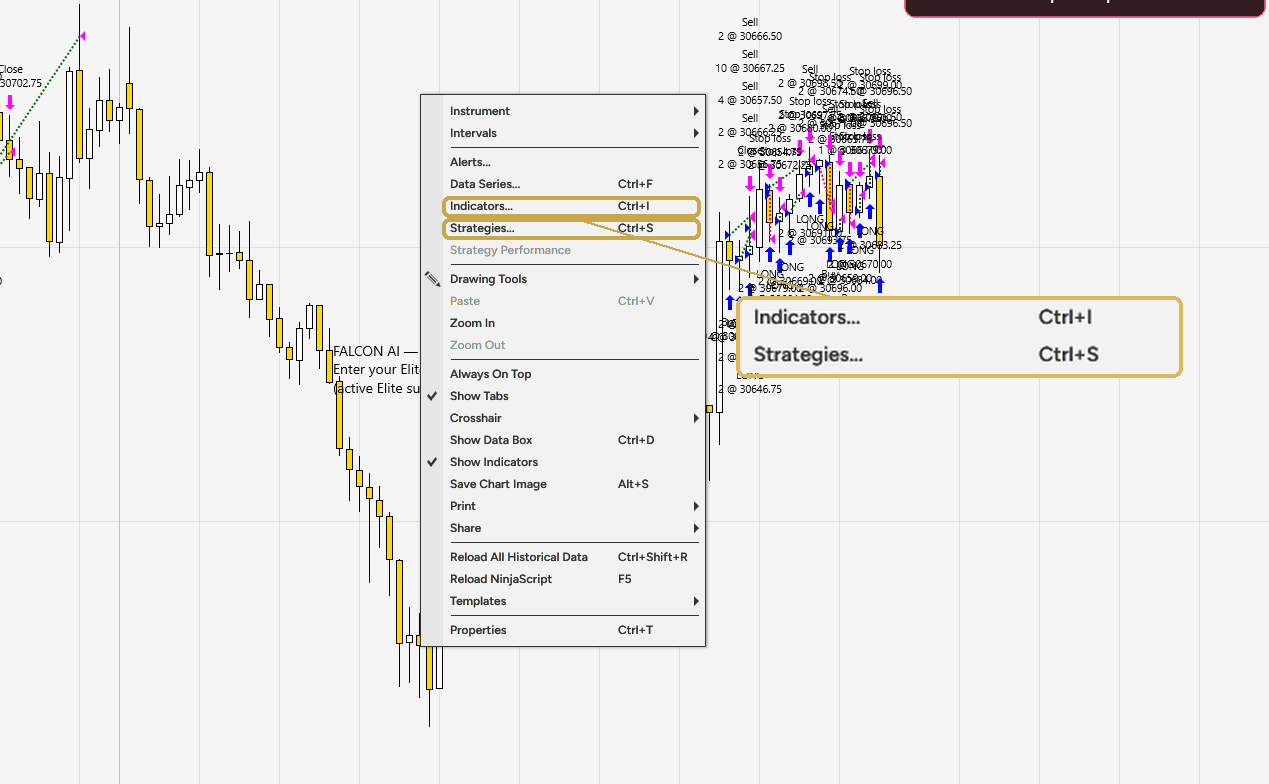
Add the indicator and the strategy. Right-click the chart → Indicators to add Falcon AI Visual (the on-chart signal overlay), then right-click → Strategies to add Falcon AI ELITE (the auto-trader that places orders).
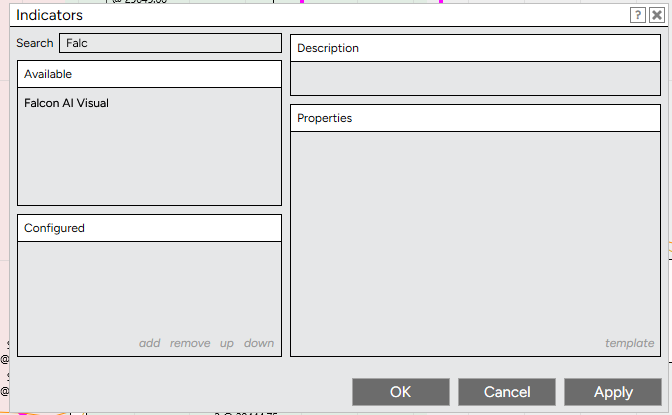
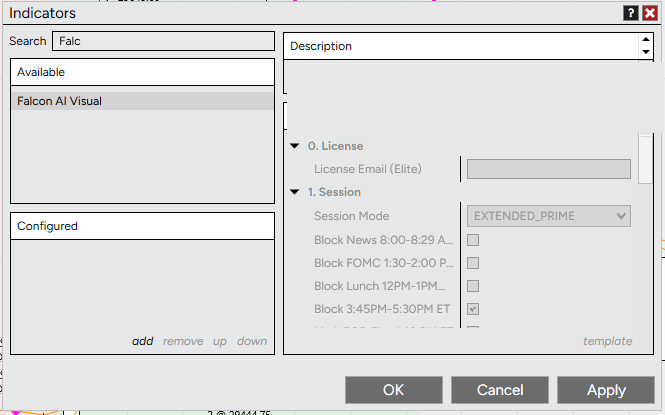
In the Indicators window, type "falcon" in the Search box (or scroll down the Available list) to find Falcon AI Visual → click it → click add → then enter your Elite email and pick your Session (steps 7–8).
6
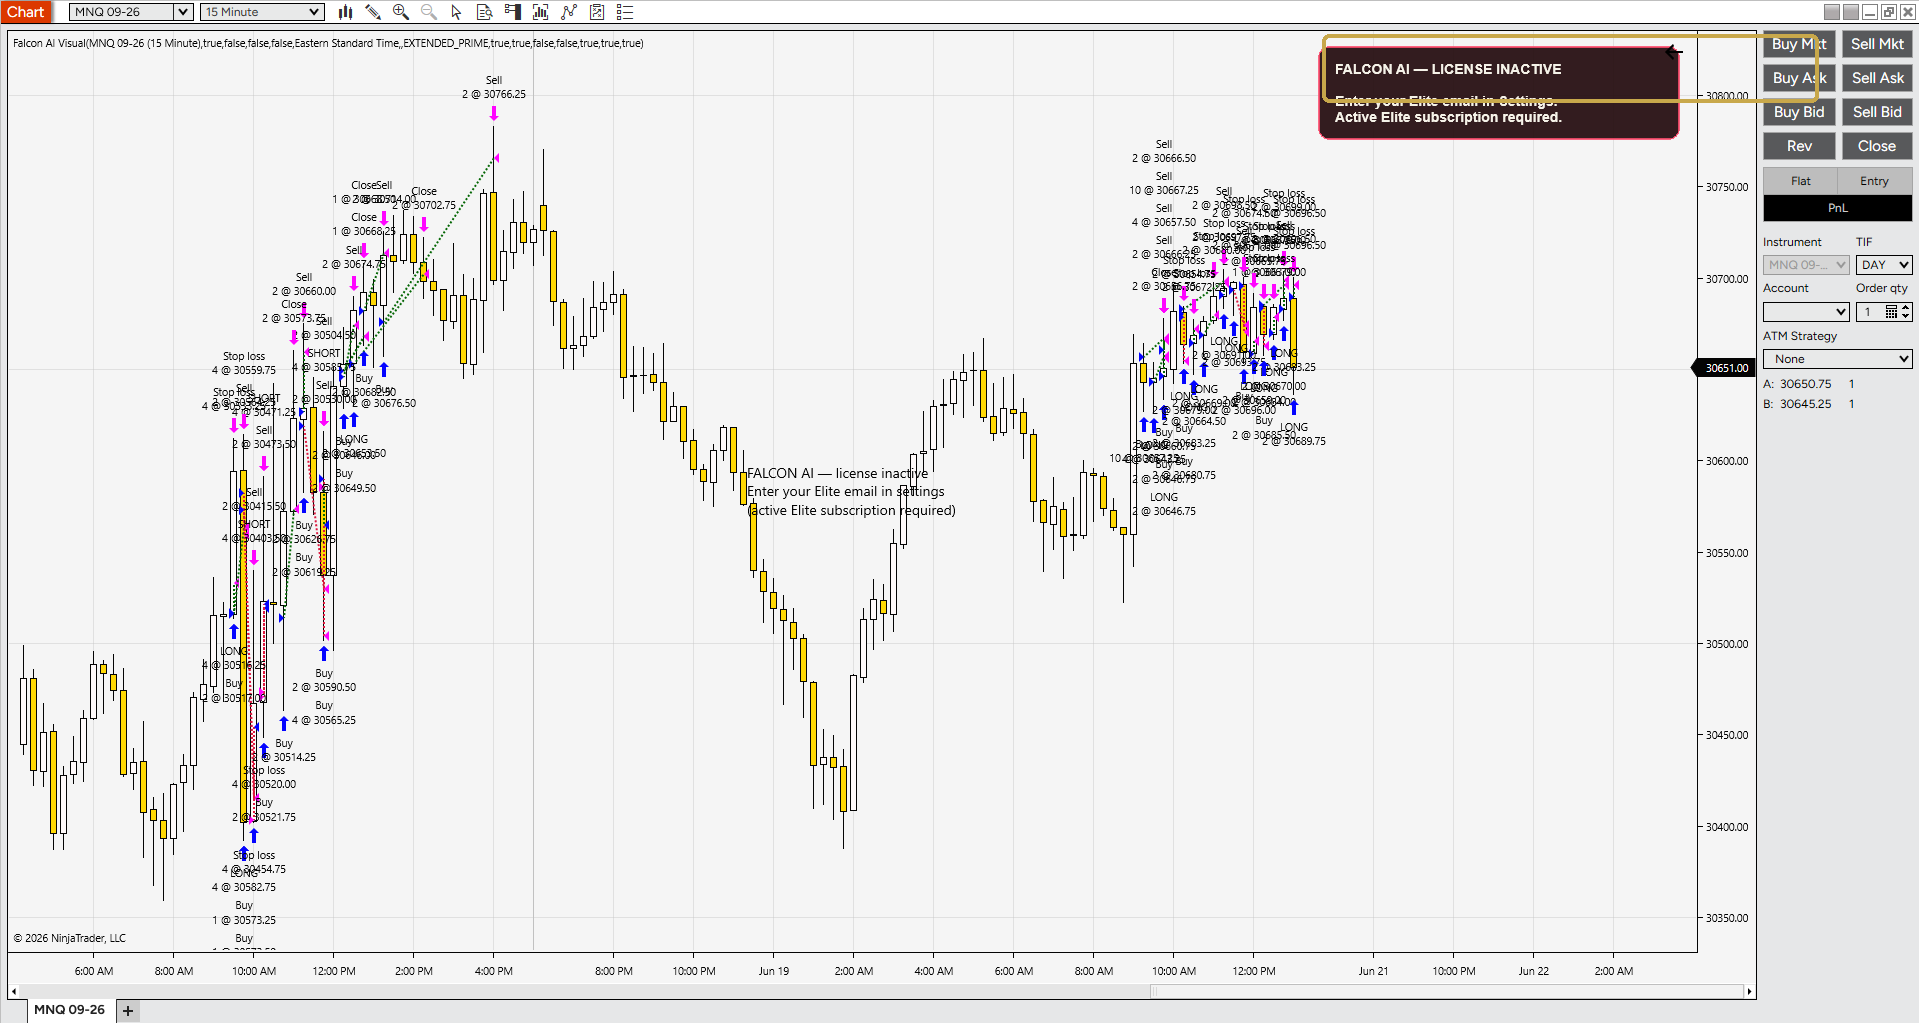
Falcon loads — and shows "LICENSE INACTIVE." That's normal: the indicator is on your chart but waiting for your Elite email. You'll activate it in the next step.
7
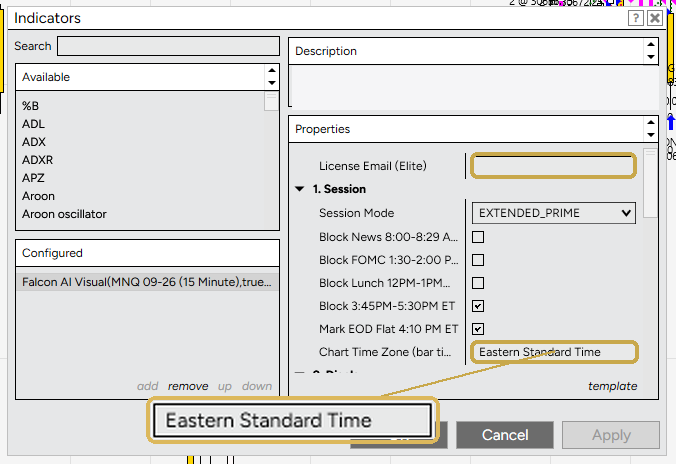
Activate it + lock the time zone. Open the Falcon AI Visual settings. Enter your Elite email in License Email (Elite), and set Chart Time Zone (bar times) to Eastern Standard Time.
⚠ TIME ZONE — THE #1 SETUP MISTAKE
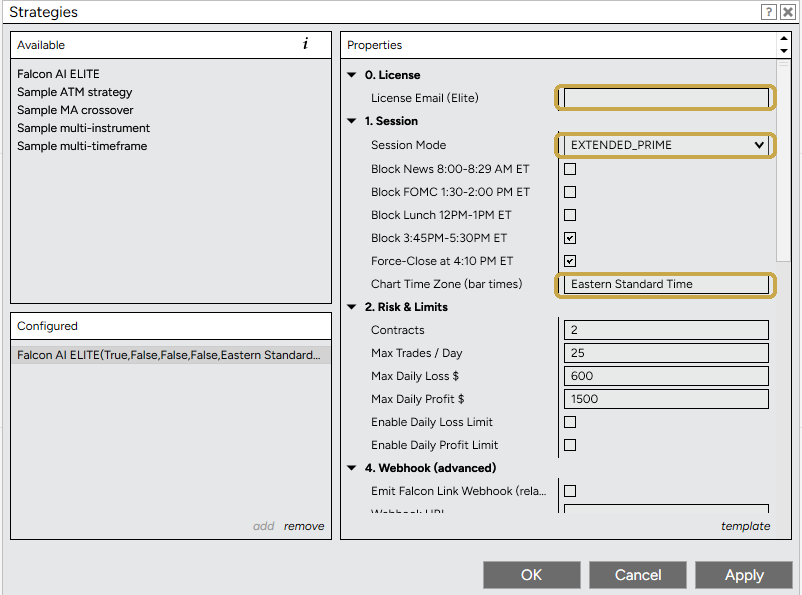
Falcon's sessions (PRIME / EXTENDED / GOLDEN, plus the news / lunch / FOMC blocks) all run on New York (Eastern) time. If you live in Central, Pacific, or anywhere else, you must leave Chart Time Zone = Eastern Standard Time — otherwise every session shifts and signals fire at the wrong clock times. Set it in both the indicator (step 7) and the strategy (step 8).
3
PART THREE
TURN ON THE STRATEGY
8
Set up Falcon AI ELITE. In the strategy properties: enter your Elite email (License Email), pick your Session Mode (your config), and again set Chart Time Zone = Eastern Standard Time. The risk limits are pre-tuned — leave them.
📐 AUTOMATIC RISK SIZING + THE MNQ MULTIPLIER
Falcon now sizes every trade for you automatically — it scales your position down in fast, volatile conditions to protect your account, and runs standard size when things are clean. It's built in; there's nothing to set.
To trade more contracts on a bigger account, use the MNQ Multiplier in the strategy properties: leave it at 1 for standard size, or set 2 / 3 / 4… to scale up proportionally — the same volatility protection applies at every level. Match it to your account, and don't set it higher than your account can comfortably handle. (MNQ only — other markets use the Contracts field.)
9
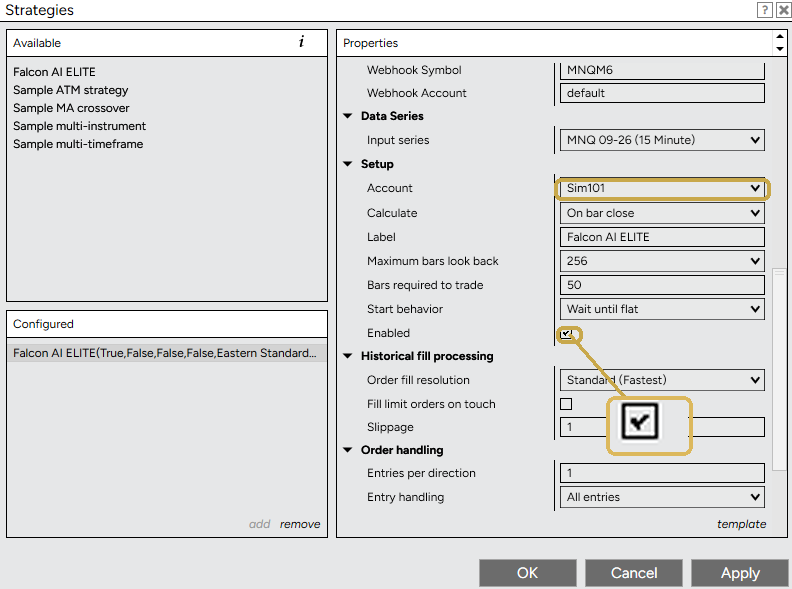
Go live on practice. Set Account to Sim101 (NinjaTrader's built-in practice account), check Enabled, and click OK. Watch it trade on Sim for a few days — when you're confident, reopen this and switch Account to your funded one.

BEFORE YOU GO LIVE
✓Run on Sim101 first for a few days — never go live on day one.
✓Set Chart Time Zone = Eastern Standard Time on the indicator and the strategy — non-negotiable if you're not on the East Coast.
✓Keep your Elite subscription + real-time data active — Falcon checks the sub on start.
✓Always trade the front-month MNQ contract (the active one).
✓Stuck on any step? Ask in Discord #ask-the-team — fast answers.
⚠Trading futures involves real risk of loss. Falcon is a tool, not a guarantee — past results don't promise future ones.
Falcon AI is operated by Falcon AI LLC (Florida, USA) and provides educational trading tools — NOT financial advice, and is not a registered investment adviser, broker-dealer, or NFA member. NinjaTrader and Tradovate are third-party platforms with their own subscriptions and terms. Futures trading involves substantial risk of loss and is not suitable for everyone.